 Why Use Google My Maps for Travel Planning?
 Why Use Google My Maps for Travel Planning?
When it comes to travel planning, efficiency and customization are key. Google My Maps is a game-changer for travelers of all kinds, offering a simple yet powerful way to create personalized itineraries that cater to your unique needs. Whether you’re a solo adventurer, a family on a tight budget, or a digital nomad juggling work and exploration, this tool has something for everyone.
Benefits of Customizing Your Itinerary
One of the biggest advantages of Google My Maps is its ability to let you tailor your travel plans exactly how you want them. You can mark your must-visit spots, plot the best routes, and even add notes or photos to each location. This not only keeps everything organized but also helps you make the most of your time and resources. Plus, you can easily share your map with travel companions, ensuring everyone is on the same page.
How It Saves Time and Money
Planning a trip can be overwhelming, especially when you’re trying to stick to a budget. Google My Maps simplifies the process by letting you visualize your entire itinerary in one place. You can identify nearby attractions, restaurants, and accommodations, reducing unnecessary detours and transportation costs. By optimizing your route, you’ll spend less time traveling and more time enjoying your destination.
Ideal for Solo Travelers, Families, and Adventurers
- Solo travelers can use it to plan safe and efficient routes, ensuring they make the most of their independence.
- Families can create kid-friendly itineraries, marking parks, museums, and restaurants that cater to all ages.
- Adventurers can plot off-the-beaten-path locations, hiking trails, and hidden gems for a truly unique experience.
Google My Maps is more than just a tool—it’s your personal travel assistant, helping you craft unforgettable journeys while staying organized and stress-free.
Getting Started with Google My Maps
How to Access and Create a New Map
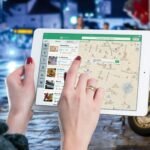
To begin building your custom travel itinerary, you’ll need to access Google My Maps. Start by opening your web browser and navigating to Google My Maps. If you’re not already signed in, log in with your Google account. Once you’re in, click on the “Create a New Map” button. This will open a blank map where you can start plotting your adventure. It’s that simple!
Basic Navigation and Interface Overview
The interface of Google My Maps is intuitive and user-friendly. Here’s a quick rundown of what you’ll see:
- Search Bar: Located at the top, this helps you find specific locations to add to your map.
- Layers Panel: On the left, you’ll find layers where you can organize different parts of your itinerary, like accommodations, restaurants, or activities.
- Map Tools: Above the map, you’ll see tools for adding markers, drawing lines, and more.
Take a moment to explore these features—it’s the first step to mastering your travel planning!
Setting Up Your Map for Ease of Use
To make your map as functional as possible, consider these tips:
- Name Your Map: Click on “Untitled Map” at the top of the layers panel to give your map a descriptive name, like “Spring 2025 Europe Adventure.”
- Add Layers for Organization: Create separate layers for different categories, such as “Museums,” “Restaurants,” or “Hiking Trails.” This keeps your map neat and easy to navigate.
- Customize Markers: Use different colors and icons for your markers to represent different types of locations. For example, blue for accommodations and red for must-see attractions.
By setting up your map thoughtfully, you’ll save time and stress when it’s time to hit the road.
Adding Destinations and Points of Interest
When building your custom travel itinerary with Google My Maps, the first step is to add all the destinations and points of interest you want to explore. Whether you’re planning a budget-friendly getaway, a solo adventure, or a family trip, this tool helps you visualize your journey with ease.
Pinning Locations Like Hotels, Restaurants, and Attractions
Start by searching for the places you want to pin on your map. Think about your hotel (or budget-friendly hostels for backpackers), must-visit restaurants (especially those with great local cuisine), and key attractions (museums, parks, or hidden gems). Simply type the location into the search bar, and click the pin icon to add it to your map. For digital nomads, this could also include coworking spaces or cafés with reliable Wi-Fi.
Pro tip: Use different colored pins to categorize your stops. For example, mark hotels in blue, restaurants in red, and attractions in green. This simple visual trick makes your itinerary easier to navigate.
Using Layers to Organize Your Itinerary
Layers are a game-changer for keeping your itinerary tidy and organized. Create separate layers for different parts of your trip—like Day 1, Day 2, or by categories such as Food, Adventure, and Culture. This is especially helpful for families, who can plan activities for kids and adults separately, or for adventurers balancing hiking trails and scenic viewpoints.
How to do it: Click the “Add layer” button and name it. Then, assign pins to their respective layers. This way, you can toggle layers on and off, keeping your map clutter-free and focused on what’s relevant for each day or category.
Adding Notes and Descriptions for Each Stop
Don’t just pin a location—add context! Click on any pin and use the description box to add notes, tips, or links. For example:
- For budget travelers, note the price range of a restaurant or the best time to visit a free attraction.
- For digital nomads, jot down Wi-Fi speeds or power outlet availability at a café.
- For families, add details like stroller accessibility or kid-friendly menus.
- For solo travelers, include safety tips or nearby landmarks to help you navigate.
Adding notes ensures you have all the information you need at your fingertips, making your trip smoother and more enjoyable. Plus, if you’re sharing the map with travel buddies, they’ll appreciate the extra details!
Customizing Your Map for Different Travel Styles
Tips for Budget Travelers: Finding Affordable Spots
Creating a custom travel itinerary on Google My Maps is a game-changer for budget travelers. Start by identifying **affordable accommodations** like hostels, budget hotels, or Airbnbs in your destination. Use the map to mark these spots along with **local markets** and **street food vendors** where you can eat delicious meals without breaking the bank. Don’t forget to add **free attractions** like parks, walking tours, and museums with free admission days. Pro tip: Layer your map with public transportation routes to save on taxi fares.
For Digital Nomads: Locating Coworking Spaces and Cafes
Digital nomads, rejoice! Google My Maps is your ultimate tool for finding **coworking spaces** and **cafes with reliable Wi-Fi**. Research and mark spots with high-speed internet and quiet ambiance, ensuring you can work effectively while exploring new cities. Add nearby **coffee shops** or **libraries** as backup options. Bonus: Include **local meetups** or networking events in your map to connect with other remote workers. This way, you can balance productivity and adventure seamlessly.
Family-Friendly and Adventure-Focused Itineraries
Traveling with kids? Use Google My Maps to design **family-friendly itineraries** that cater to all ages. Mark **safe accommodations**, **parks**, and **kid-friendly attractions** like zoos, aquariums, or interactive museums. Add **restaurants with children’s menus** and **play areas** to keep everyone happy. For adventure seekers, the map can highlight **hiking trails**, **hidden beaches**, and **outdoor activities** like kayaking or rock climbing. Layer your map with points of interest to ensure a fun and safe trip for the whole family.
Solo Travelers: Planning Safe and Enjoyable Routes
Solo travelers, Google My Maps lets you take control of your journey. Mark **safe accommodations** in well-lit, central areas and **popular attractions** to avoid secluded spots. Include **local transportation hubs** and **emergency contacts** for added peace of mind. For a more immersive experience, add **local workshops** or **cultural events** to your map. This ensures you stay connected and engaged while traveling independently.
Cultural Tourists and Urban Explorers: Mapping the Best Experiences
If you’re a cultural enthusiast, use Google My Maps to create a **tailored cultural itinerary**. Highlight **museums**, **historical sites**, and **local landmarks** to explore. Don’t forget to add **popular food spots** like street food stalls or Michelin-starred restaurants. For urban explorers, map out **hidden alleys**, **street art locations**, and **vibrant neighborhoods** to discover the city’s soul. This way, you’ll experience the destination like a local.
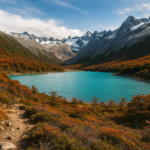
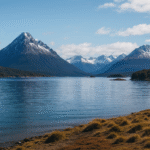
Adventurers and Ecotourists: Exploring Nature’s Wonders
Adventure lovers, Google My Maps is your guide to the wild. Mark **hiking trails**, **national parks**, and **hidden gems** for an unforgettable journey. Include **camping spots**, **eco-lodges**, and **sustainable travel options** to minimize your environmental impact. Pro tip: Layer your map with **weather updates** and **safety tips** for outdoor activities. This ensures you’re prepared for anything nature throws your way.
Sharing and Collaborating on Your Itinerary
How to Share Your Map with Travel Companions
Once your custom travel itinerary is ready on Google My Maps, sharing it with your travel companions is a breeze. Simply click the Share button, and you’ll be able to generate a link or invite others via email. This is perfect for group trips or when you want to keep everyone on the same page. Pro tip: set the access to “Anyone with the link can view” if you’re sharing with friends or family who don’t have a Google account.
Collaborating in Real Time for Group Trips
For group adventures, collaboration is key. By allowing “Anyone with the link can edit,” your travel companions can add their own suggestions, like must-visit spots or hidden gems they’ve discovered. This real-time collaboration ensures everyone’s interests are included, making the trip more enjoyable for all. Plus, it’s a great way to divide planning tasks—someone can focus on foodie spots while another handles outdoor activities.
Exporting Your Map for Offline Use
If you’re heading to a destination with spotty internet or want to save on data, exporting your map for offline use is a game-changer. Google My Maps allows you to export your itinerary as a KML file, which can be opened in Google Earth or other mapping apps. Alternatively, you can take screenshots of your map and save them to your device. This ensures you’ll never be stranded without directions, even in the most remote locations.
Practical Tips for Using Google My Maps on the Go
Accessing Your Map on Mobile Devices
One of the best features of Google My Maps is its seamless integration with mobile devices. Whether you’re a digital nomad hopping between cafés or a backpacker exploring off-the-beaten-path destinations, accessing your custom itinerary is as easy as opening the Google Maps app. Simply open the app, go to the “Saved” tab, and select your custom map under “Maps.” Pro tip: Pin it to your home screen for even quicker access. This ensures your travel plans are always just a tap away, even when you’re on the move.
Saving Data by Downloading Offline Maps
For budget travelers or those venturing into areas with spotty internet, downloading offline maps is a game-changer. Here’s how to do it: Open Google Maps, search for the area you’re visiting, tap the name or address at the bottom, and select “Download.” You can also adjust the area to ensure it covers your entire itinerary. Remember: This feature not only saves on data costs but also ensures you’re never lost, even in remote locations. Perfect for adventurers exploring nature trails or hidden beaches!
Updating Your Itinerary as Plans Change
Travel plans can shift unexpectedly, and that’s okay! Google My Maps makes it simple to adapt your itinerary on the fly. Whether you’re a solo traveler discovering a new café or a family adjusting to weather changes, you can edit your map anytime. Just open Google My Maps on your phone or laptop, add new destinations, update notes, or remove outdated spots. Bonus: If you’re traveling with others, share the map with them so everyone stays in the loop. This flexibility ensures your trip remains stress-free and tailored to your needs.
Examples of Custom Itineraries for Inspiration
A Budget-Friendly European City Tour
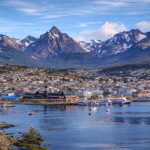
Exploring Europe on a budget doesn’t mean sacrificing memorable experiences. Start in Prague, where affordable accommodations and free walking tours abound. Next, head to Budapest for its thermal baths and ruin bars—both easy on the wallet. Wrap up your journey in Krakow, where you can visit historical sites like Auschwitz and Wawel Castle while enjoying hearty, inexpensive meals. Use Google My Maps to plot these cities, adding affordable hostels, free attractions, and local eateries to your itinerary.
A Digital Nomad’s Southeast Asia Route
Southeast Asia is a haven for digital nomads, offering low costs and strong internet connectivity. Begin in Chiang Mai, Thailand, known for its coworking spaces and vibrant expat community. Next, travel to Da Nang, Vietnam, where you can work from beachside cafes and explore ancient temples. Finish your journey in Bali, Indonesia, where coworking hubs like Dojo Bali provide the perfect work-travel balance. Use Google My Maps to mark coworking spaces, cafes with reliable Wi-Fi, and affordable stays to create a seamless itinerary.
A Family Road Trip Across the U.S.

A family road trip across the U.S. is a classic adventure that’s both fun and manageable with proper planning. Start in Chicago, exploring Millennium Park and museums like the Field Museum. Drive to Mount Rushmore in South Dakota for a historical pitstop, then continue to the Grand Canyon for breathtaking views. End your trip in San Diego, hitting family-friendly spots like the zoo and beaches. Use Google My Maps to map out your route, adding kid-friendly attractions, rest stops, and picnic spots for a stress-free journey.
FAQs
- How do I save money on a European city tour?
- Focus on affordable destinations like Prague and Budapest, book budget accommodations in advance, and prioritize free attractions.
- What’s the best way to plan a digital nomad itinerary?
- Use Google My Maps to mark coworking spaces, cafes with reliable Wi-Fi, and affordable stays for a seamless work-travel experience.
- How do I keep kids entertained on a road trip?
- Plan frequent stops at kid-friendly attractions, pack snacks and games, and use Google My Maps to mark rest areas and activities.
About Grace Castle
Grace Castle, 29, is a passionate traveler and digital nomad who turned her love for exploring the world into a career. With years of experience traveling across different countries, she has mastered the art of smart travel planning, working remotely while discovering new destinations.
An expert in budget travel, local culture, and remote work, Grace shares valuable tips for those looking to travel more while spending less. Her mission is to help fellow travelers explore the world with ease, safety, and authentic experiences.
When she’s not writing about her adventures, Grace can be found discovering cozy cafés, learning new languages, or planning her next trip.